2013年10月31日
- EV3 Direct Command for Mac(Eclipse Java) 利用方法
- EV3技術情報
- 外部連携
EV3 Direct Command for Mac (Eclipse Java) 利用方法
1 必要なもの
1.1 mac(パソコン)
OS
Mac OS 10.6、10.7、10.8の最新にアップデートしたMac
Macのスペック
インテルCPU デュアルコア2.0 GHz以上
2GB以上のRAMメモリー
2GB以上のHDDの空き容量
XGA (1024 x 768)以上の画面解像度
USBポート(USB2.0)
Bluetooth
1.2 ハードウェア
LEGO MINDSTORMS EV3基本セットと拡張セット
1.3 ソフトウェア
(1)Eclipse
http://www.eclipse.org/downloads/
(2) Java Development Kit
http://www.oracle.com/technetwork/java/javase/downloads/index.html
(3) EV3Command4MacJava
/tech_info/EV3Command4MacJava.zip
1.4 準備
1.4.1 MacへEV3登録(Bluetoothのペアリング)とポート登録
 初回は、MacとEV3をペアリングする必要があります。
1.4.1.1 EV3のBluetooth設定
1) EV3の設定画面でBluetoothを選択します。
2) EV3のConnectionsからVisibilityとBluetoothにチェックがついていることを確認します。(チェックがない場合は、チェックをつけます) iPhone/iPad/iPodのチェックは外れていることを確認します。
1.4.1.2 Macの設定
1) EV3を起動します。
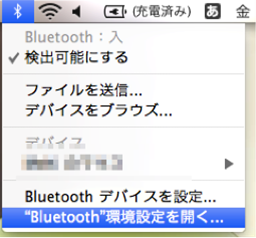
2) 右上の「Bluetooth」マークを選択して、赤枠の「Bluetoothデバイスを設定…」を選択します。
3) Bluetooth設定アシスタントにEV3が表示されるまで待ちます。 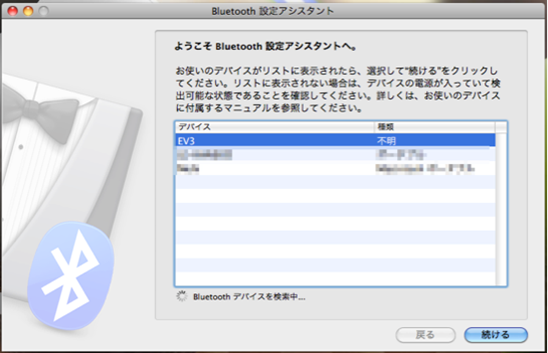 EV3が表示されたら「続ける」ボタンを選択して、EV3とペアリングを行ってください。
4) 「Bluetooth環境設定を開く…」を選択します。
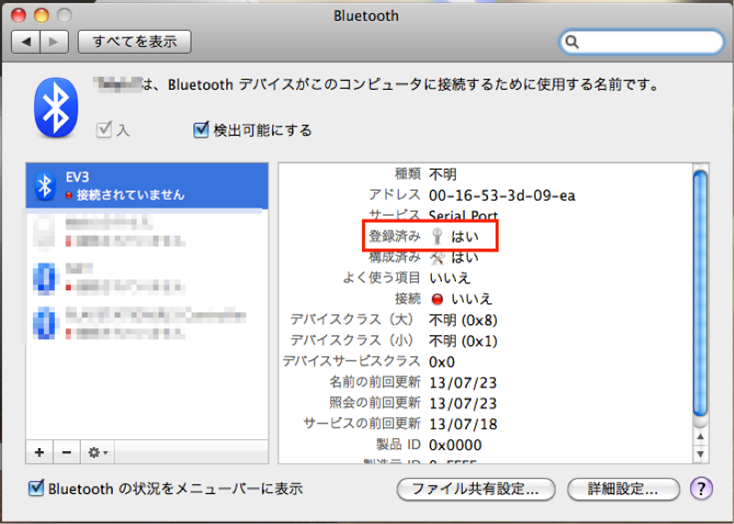
5)「登録済み」又は「ペアリング済み」が「はい」になっていることを確認します。
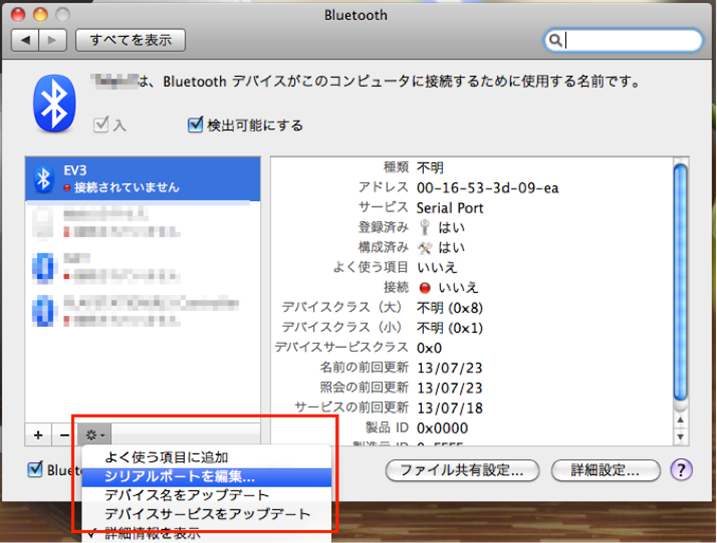
6) EV3とのペアリングが確認出来たら、左下にある「歯車」ボタンを選択して、赤枠の「シリアルポートを編集…」を選択してください。
7)赤枠の「+」ボタンを選択して、シリアルポートを追加します。
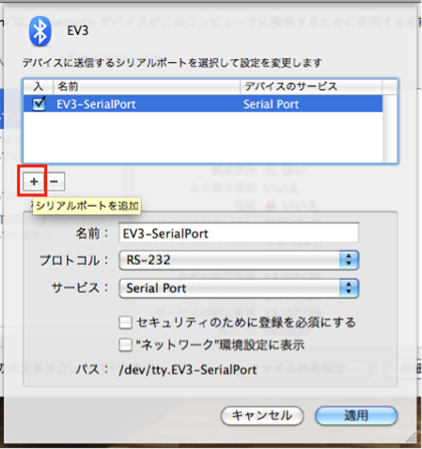
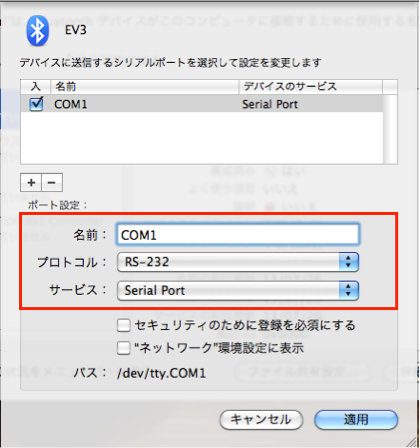 8)赤枠、3項目の設定を行います。
名前:わかりやすい名前に変えてください。
※ここではCOM1にしています
プロトコル:「RS-232」
サービス:Serial Port」
3項目の設定が終わったら右下の「適用」ボタンを選択します。
以上で、EV3とのペアリング、シリアルポートの作成は終了です。
1.4.2 Macにライブラリをインストールする
1)「Finder」から「EV3_Release_Version」 > 「mac」 > 「Executable_program > 「RXTX2-1-7_Library_Install」 > 「Install.command」を選択します。

2) ターミナルが起動したら、パスワードを入力します。

3) 「Success.」の文字が表示されればインストールの完了です。

1.5 Eclipseのプロジェクトインポート
※EV3Command4MacJava.zipファイルを解凍します。
このプロジェクトをEclipseにインポートします。
1.6 新規プロジェクト作成
EV3を操作するために新規のプロジェクトを作成します。
その際、さきほどインポートしたプロジェクトをビルドパスに追加してください。
1.7 使用手順
以下のようなコードを書くことでEV3の操作をすることが可能です。
※ポートは「COM1」で設定しています。
[Main.java]
import java.util.ArrayList;
import com.ev3.Motor.MotorControl;
import com.ev3.Motor.MotorControlEntity;
import com.ev3.Motor.MotorPort;
import com.ev3.Motor.MotorPower;
import com.ev3.sensor.SensorState;
import com.ev3.serialport.SerialPortControl;
public class Main {
public static void main(String[] args) {
SerialPortControl control = new SerialPortControl("COM1");
try {
// コントローラ
control.connect();
// モーター回転
MotorControlEntity entityA = new MotorControlEntity( );
entityA.motorPort = MotorPort.PORT_A;
entityA.motorPower = MotorPower.DEFAULT_FRONT;
MotorControlEntity entityB = new MotorControlEntity( );
entityB.motorPort = MotorPort.PORT_B;
entityB.motorPower = MotorPower.DEFAULT_BACK;
ArrayList<MotorControlEntity> entityList =
new ArrayList<MotorControlEntity>( );
entityList.add(entityA);
entityList.add(entityB);
int[] startData = MotorControl.getCommand(entityList);
control.send(startData);
Thread.sleep(5000);
// センサー
for (int i = 0; i < 4; i++) {
control.send(SensorState.commandSensorName(i));
String sensorName = SensorState.getSensorName( ).toString();
control.send(SensorState.commandSensorRawValue(i));
float sensorRow = SensorState.getSensorRawValue( );
control.send(SensorState.commandSensorScaledValue(i));
int sensorScaled = SensorState.getSensorScaledValue( );
if (sensorName.equals("NONE") ||
sensorName.equals("UNKNOWN") ||
String.valueOf(sensorRow).equals("NaN") ||
sensorScaled == -128)
{
// センサーから値を取得できなかった場合
} else {
// センサーから値を取得できた場合
System.out.println("SensorName:" + sensorName);
System.out.println("sensorRow:" + sensorRow);
System.out.println("sensorScaled:" + sensorScaled);
}
}
// コントローラ切断
control.disConnect( );
} catch (Exception e) {
}
}
}
1.8 サンプルプログラムの説明
サンプルコードは、モーターを回すコードです。
このコードを実行すると、ポートAに接続しているモーターが回転します。
5秒後に接続を切断します。
それ以外の操作については、EV3Command4MacJava.zipのプロジェクト内に入っている、「EV3.java」やパッケージ「com.ev3.Motor」「com.ev3.sensor」の中のクラスを参照してみてください。

LEGO Mindstorms Education technical information byAfrel. Co. Ltd. is licensed under a Creative Commons Attribution-NonCommercial-NoDerivs 3.0 Unported License.
