2013年9月20日
- EV3 Direct Commands for Android
- EV3技術情報
- 外部連携
EV3 Direct Commands for Android
EV3Command API操作方法(Android - EV3)
1 必要なもの
EV3 とAndroid のBluetooth 通信を行うために以下のライブラリを作成しました。このライブラリはAndroid アプリを作成する際に利用してください。
EV3Command
必要な機材は以下のとおりです。
- LEGO MINDSTORMS EV3
-モーター
-各種センサー - Android 端末
-Bluetooth 内蔵
2 準備
2.1 ライブラリの取り込み
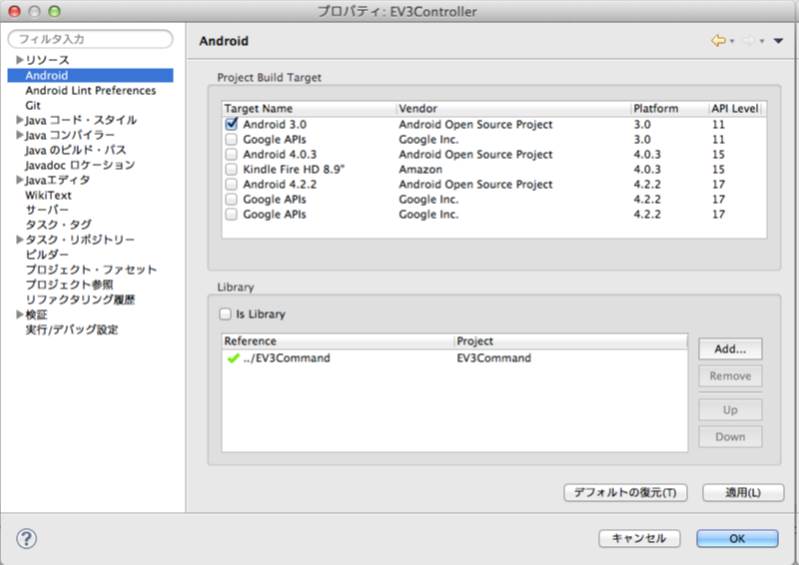
まずは,このライブラリを使用するプロジェクトA を作成します。そして,プロジェクトA にEV3Command のjar ファイル
を取り込む必要です。Eclipse での開発であれば,EV3Command をインポートし,プロジェクトA の「プロパティ>Android」
のLibrary の項目で「Add...」ボタンを押してEV3Command を追加します。(図1).

図1: ライブラリの追加
2.2 Manifest への追加項目
プロジェクトA のAndroidManifest.xml にBluetooth を使用するために以下のコードを書きます。
リスト1: AndroidManifest.xml への追加項目
|
<uses -permission android:name="android.permission.BLUETOOTH" /> |
2.3 ペアリング
Android とEV3 はBluetooth のペアリングをしておく必要があります。
3 使用手順
3.1 接続
接続にはEV3 のMAC アドレスを使い,BluetoothAdapter インスタンスのgetRemoteDevice(String) を用いて, BluetoothDevice
インスタンスを用意します。このインスタンスをライブラリに渡し,open() メソッドを用いると接続が完了します。概要を以下に示しました。
リスト2: 接続
|
private BluetoothAdapter mBtAdapter = null; // --- ---- // Get default adapter // --- ---- // Get the device MAC address AndroidComm.getInstance().setDevice(device); // Set device // Connect to EV3 |
3.2 モーターの利用
モーターの利用の際には,Motor クラスを利用します。Motor クラスは,A~D のポートに対応して,Motor クラスでA~D が用意されています。
以下のようにMotor.A~Motor.D を使用できます。
リスト3: モーターのインスタンス
|
private Motor mLeftMotor = Motor.B; |
接続を行った後に使用できるメソッドは以下のとおりです。
リスト4: モーター
|
/**
* Get the ID of the motor. One of 'A', 'B', 'C' or 'D'.
*/
public final char getId()
/**
* Causes motor to rotate forward.
* @return Error value. 0x02 means success. 0x04 means fail.
*/
public int forward()
/**
* Causes motor to rotate backward.
* @return Error value. 0x02 means success. 0x04 means fail.
*/
public int backward()
/**
* Sets the motor speed.
* NOTE: this method doesn't send commands to EV3. To update the speed ,
* use forward or backward method following this.
* @param speed (0 ~ 100 %)
*/
public void setSpeed(int speed)
/**
* Gets the current motor speed.
* @return speed (0 ~ 100 %)
*/
public int getSpeed()
/**
* Stops the motor using brakes.
*
* @return Error value. 0x02 means success. 0x04 means fail.
*/
public int stop()
|
3.3 センサーの利用
カラーセンサーやタッチセンサーなどのセンサーの種類をタイプといい,各センサーにはいくつかのモードがあります。例えば,カラー
センサーならば反射光の強さを受けるモード,何色か判断するモードなどです。現在用意しているセンサのタイプとモードは
以下のとおりです。
共通
-UnidentifiedSensor
*センサーのパーセント値
*センサーのSI 単位の値NXT 用
-LightSensor
*反射したパーセント値(SI 値も同じ)(NOT TESTED)
-SoundSensor
*DB 値(NOT TESTED)
*DBA 値(NOT TESTED)EV3 用
-TouchSensor
*今おされているか(TESTED)
*何回押されたか(TESTED)
-ColorSensor
*反射した光のパーセント値(SI 値も同じ)(TESTED)
*周囲の明るさのパーセント値(TESTED)
*色(9 色に判断できるようだが何色がどの数値に対応するかは未調査)(TESTED)
※センサーは,初めに取得した値が正しくない場合があります。そのため,モードを変更した際などは空読みを行っておくことをお勧めします。
センサーは1~4 のポートに対応して,SensorPort クラスでS1~S4 が定義されています。センサーを作成する際に,以下のように
S1~S4 を指定します。
リスト5: センサーのインスタンス
|
private UnidentifiedSensor mUnidentifiedSensor = new UnidentifiedSensor(SensorPort.S1); |
3.3.1 接続されているセンサーがわからない場合
UnidentifiedSensor クラスを用います。使用できるメソッドは以下のとおりです。
リスト6: 不明なセンサー(共通)
|
/**
* An unidentified sensor.
* @param sensor
* e.g. SensorPort.S1
*/
public UnidentifiedSensor(SensorPort sensor)
/**
* Sets the type and mode of the sensor.
* @param type
* @param mode
*/
public void setTypeAndMode(int type , int mode)
/**
* Gets the name of the sensor.
* @return
*/
public String getName()
/**
* Gets the SI unit value of the sensor.
* @return
*/
public float getSiValue()
/**
* Gets the percent value of the sensor.
* @return
*/
public int getPercentValue() |
3.4 LightSensor(NXT)
使用できるメソッドは以下のとおりです。
リスト7: 光センサー(NXT)
|
/**
* LightSensor. * NXT lights sensor. * @param sensor * e.g. SensorPort.S1 */ public LightSensor(SensorPort sensor) /** * Returns light reading as a percentage. * * @return 0 to 100 (0 = dark , 100 = bright) */ public int getLightPercent() /** * Returns ambient light reading as a percentage. * * @return 0 to 100 (0 = dark , 100 = bright) */ public int getAmbientLightPercent() |
3.5 SoundSensor(NXT)
使用できるメソッドは以下のとおりです。
リスト8: サウンドセンサー(NXT)
|
/**
* Used to detect the loudness of sounds in the environment. * NXT sound sensor. * @param sensor * e.g. SensorPort.S1 */ public SoundSensor(SensorPort sensor) /** * Returns the decibels measured by the sound sensor. * * @return dB - decibels */ public float getdB() /** * Returns sound within the human hearing frequency range , normalized by * A-weighting. Extremely high frequency or low frequency sounds are not * detected with this filtering (regardless of loudness). * * @return dB(A) - decibels with A-weighting */ public float getdBA() |
3.6 TouchSensor(EV3)
使用できるメソッドは以下のとおりです。
リスト9: タッチセンサー(EV3)
| /**
* EV3 touch sensor.
* @param sensor * e.g. SensorPort.S1 */ public TouchSensor(SensorPort sensor) /** * * @return true if sensor is pressed. */ public boolean isPressed() /** * * @return the number of bumped. */ public float getBumps() |
3.7 ColorSensor(EV3)
使用できるメソッドは以下のとおりです。
リスト10: カラーセンサー(EV3)
| /** * EV3 color sensor. * @param sensor * e.g. SensorPort.S1 */ public ColorSensor(SensorPort sensor) /** * Returns light reading as a percentage. * * @return 0 to 100 (0 = dark , 100 = bright) */ public int getLightPercent() /** * Returns ambient light reading as a percentage. * * @return 0 to 100 (0 = dark , 100 = bright) */ public int getAmbientLightPercent() /** * Returns color as a percentage. * * @return 0 to 100 */ public int getColorPercent() /** * Returns color. * * @return 0 to 8 * 4 - yellow , * TODO investigation */ public float getColor() |
4 既知の問題
接続の解除が正しく動作していません。接続解除は以下のように行います。
リスト11: 接続解除
|
// Close the connection |
これは,内部でBluetoothSocket のclose() メソッドを使っているが,これを行うと次の接続時に失敗します。現在は,EV3 の
Bluetooth 機能を一旦立ち上げなおすことで解決しています。

LEGO Mindstorms Education technical information byAfrel. Co. Ltd. is licensed under a Creative Commons Attribution-NonCommercial-NoDerivs 3.0 Unported License.
